

How Are Vinyl Fences Installed?
Vinyl fencing has become increasingly popular due to its durability, low maintenance requirements, and aesthetic appeal. Whether you’re looking to enhance the curb appeal of your property or add privacy to your backyard, vinyl fences offer a versatile solution. However, understanding the installation process is crucial to ensuring a successful and long-lasting fence. This comprehensive guide will explore the step-by-step process of installing vinyl fencing, covering everything from preparation to post-installation care.
1. Planning and Preparation
Before diving into the installation process, proper planning and preparation are essential. Here’s what you need to consider:
- Property Line and Regulations: Determine the exact location of your property line and any local regulations or homeowner association guidelines regarding fence installation. Obtain any necessary permits before proceeding.
- Design and Layout: Decide on the style and layout of your vinyl fence. Consider factors such as height, gate placement, and any slopes or uneven terrain that may affect the installation.
- Gather Materials: Purchase all necessary materials for the project, including vinyl fence panels, posts, gate hardware, cement, gravel, and tools such as a level, post hole digger, and measuring tape.
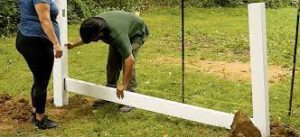
2. Installing End, Corner, and Gate Posts
Start by installing the end, corner, and gate posts, as these are critical for providing stability and support to the fence. Follow these steps:
- Mark Post Locations: Use stakes and string to mark the locations of the posts, ensuring they are evenly spaced and aligned according to your design layout.
- Dig Post Holes: Use a post hole digger to dig holes for the posts, ensuring they are deep enough to accommodate at least one-third of the post’s length and below the frost line if applicable.
- Set Posts in Concrete: Place the posts in the holes and fill them with concrete, making sure they are level and plumb. Allow the concrete to cure according to the manufacturer’s instructions before proceeding.
- Install Post Caps: Once the concrete has cured, install post caps on top of each post to provide protection and a finished look.
3. Attaching Fence Panels
With the posts in place, it’s time to attach the vinyl fence panels. Follow these steps:
- Measure and Cut Panels: Measure the distance between the posts and cut the fence panels to the appropriate size using a saw if necessary.
- Secure Panels to Posts: Slide the panels into the grooves on the posts and secure them in place using screws or brackets, ensuring they are level and aligned with the ground.
- Connect Panels: If multiple panels are being used to cover a long stretch, connect them together using the provided connectors or brackets, ensuring a seamless appearance.
4. Installing Gates
If your vinyl fence includes gates, follow these steps to install them:
- Measure and Mark Gate Location: Determine the location of the gate(s) and mark the positions of the hinge and latch posts accordingly.
- Install Hinge Posts: Dig holes for the hinge posts, ensuring they are deep enough, and set them in concrete. Allow the concrete to cure before proceeding.
- Attach Hinges and Gate: Attach the hinges to the gate and then to the hinge posts, ensuring proper alignment and smooth operation. Install the latch post and latch mechanism according to the manufacturer’s instructions.
5. Finishing Touches and Maintenance
Once the vinyl fence and gates are installed, there are a few finishing touches and maintenance tasks to consider:
- Trim Excess Material: Trim any excess material from the tops of the posts or panels using a saw or utility knife for a clean, polished look.
- Check for Stability: Inspect the fence and gates for stability and make any necessary adjustments to ensure they are secure and level.
- Clean Regularly: Vinyl fencing is relatively low maintenance, but periodic cleaning with soap and water can help preserve its appearance and extend its lifespan.
- Monitor for Damage: Look for any signs of damage, such as cracks or warping, and address them promptly to prevent further deterioration.
6. Dealing with Slopes and Uneven Terrain
Installing vinyl fencing on slopes or uneven terrain requires additional consideration and adjustments to ensure a secure and visually appealing result. Here’s how to tackle this challenge:
- Determine the Grade: Begin by assessing the degree of slope or unevenness in the terrain where the fence will be installed. This will help you plan for any necessary adjustments.
- Adjust Post Heights: For sloped terrain, adjust the height of the fence posts accordingly to ensure that the fence panels remain level. This may involve setting some posts deeper into the ground on the downhill side or using taller posts to accommodate the slope.
- Step Installation: A step installation may be necessary in cases of significant slope. This involves installing the fence panels in sections, with each section stepping down or up the slope as needed. Use longer panels for sections with greater height differentials.
- Rackable Panels: Consider using rackable fence panels, which are designed to accommodate slopes without the need for stair-stepping. These panels feature rails that can pivot or adjust to follow the contours of the terrain, maintaining a consistent height from one end to the other.
7. Enhancing Privacy and Security
Vinyl fencing offers excellent privacy and security benefits, but there are additional measures you can take to enhance these aspects further:
- Add Privacy Slats: If privacy is a priority, consider inserting privacy slats into the fence panels. These slats are available in various colors and styles. They can be easily inserted into the pre-cut slots in the panels, providing additional privacy without sacrificing the fence’s aesthetic appeal.
- Install Security Features: To enhance security, consider adding features such as locking gates, security cameras, or motion-sensor lighting along the fence line. These additions can help deter trespassers and provide you and your family peace of mind.
8. Understanding Vinyl Fence Maintenance
While vinyl fencing is known for its low maintenance requirements, some routine care is necessary to keep it looking its best:
- Cleaning: Periodically clean the fence with mild detergent and water to remove dirt, dust, and other debris. Avoid using abrasive cleaners or pressure washers, which can damage the vinyl surface.
- Inspect for Damage: Regularly inspect the fence for signs of damage, such as cracks, chips, or loose panels. Address any issues promptly to prevent them from worsening over time.
- Avoid Harsh Chemicals: Avoid using harsh chemicals or solvents when cleaning the fence, as these can cause discoloration or damage to the vinyl material. Stick to gentle cleaning solutions and a soft brush or cloth.
- Protect from Lawn Equipment: Take care when using lawnmowers, trimmers, or other equipment near the fence to avoid accidental damage. Consider installing protective barriers or edging to prevent direct contact with the fence.
9. Long-Term Considerations and Warranty
Vinyl fencing is designed to provide long-lasting performance and durability, but it’s essential to understand the manufacturer’s warranty and any long-term considerations:
- Warranty Coverage: Review the manufacturer’s warranty to understand what is covered and for how long. Most reputable vinyl fence manufacturers offer warranties against defects in materials and workmanship for a specified period.
- Proper Installation: Ensure the fence is installed according to the manufacturer’s guidelines and industry best practices to maintain warranty coverage. Improper installation or modifications may void the warranty.
- Regular Maintenance: Follow the recommended maintenance guidelines provided by the manufacturer to keep the fence in optimal condition and preserve its warranty coverage.
In conclusion, the installation of vinyl fencing involves careful planning, precise execution, and attention to detail. By following the steps outlined in this guide and taking proper care of your fence, you can enjoy the benefits of a beautiful and long-lasting addition to your property. Whether you’re enhancing your home’s curb appeal or creating a private oasis in your backyard, vinyl fencing is a versatile and durable solution for homeowners everywhere.